Saturday 26 July 2014

Soutache style jewellery tutorial

Hellooo,

As I mentioned in my last post I have been putting together a special tutorial for you all :0) And the tutorial is for some Soutache style jewellery:


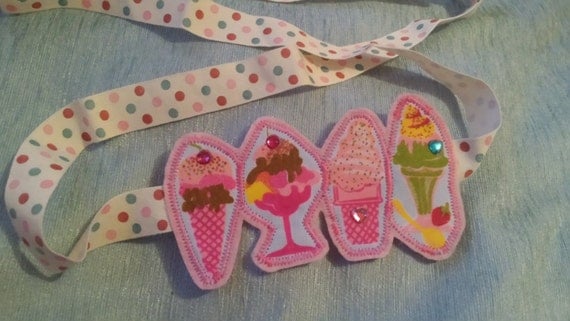
Soutache is a really interesting craft that I learnt about when watching Create and Craft one morning :) It is essentially a craft which uses braid and beads/gems which are all sewn in pretty, often swirled patterns to create beautiful jewellery and decorations- used to decorate military uniforms in the past. There is tons more information and soutache inspiration on This! website. When watching create and craft I really wanted to try making soutache items but... I didn't have any special soutache cord, backing material etc... However, after a bit of experimentation I found you could create soutache style pieces (see picture above) using items that most crafters will have in their stashes (+ a bit of imagination of course :)

The piece I made above is just to give you an idea of the kind of thing you can make- I encourage you to go with the flow really, I just 'free styled it really'- coming up with the design as I sewed, and just swirling the cords and adding beads however looked good.

To begin you will need:


  • Some shiny/slightly silky fabric (remnants will do)
  • Felt
  • Flat back stones/gems or larger flat beads
  • seed beads (optional)
  • A pen/pencil
  • A hot glue gun/craft glue (not needed if you are not incorporating flat backs)
  • A roleau turner (optional- but it does make things easier)
  • Needles and Matching colour threads.
  • Scissors
  • And as I said before a bit of imagination! :)

Now onto how to do it:

I mentioned that instead of using braid I came up with and alternative and that alternative is lengths of roleau (a cord made using long thin strip of fabric cut on the bias which is stitched and then turned through). There is quite an informative tutorial for how to make roleau cords Here! That page also shows you how to turn through your roleau using the needle and thread method. Whereas in my quick roleau tutorial below I just use a roleau turner. 

Right so ad I mentioned to make your roleau cord take your chosen fabric and cut some bias (45 to the selvedge or straight of grain this gives the fabric more movement and stretch so helps when bending the roleau and turning it through) strips (make them about half the width of a standard ruler and just as long as you can get from your remnants :)


Fold each strip right side to right side and sew down the strip about 3 - 4 mm in from the fold. Then trim down your seam allowances to a few mm:


Turn through:


You now have your mock - soutache cord and can begin creating you design...

... Cut a square of felt big enough for your design and take the flat back or bead you want in the centre of your design/to start with and glue or sew it down in position on the felt:

Now, as I said before I didn't want to create a tutorial for the exact piece I made as it is often nice for people to explore their own ideas so I am not going to go through the exact positioning for my roleau but I will go though the special way of sewing them in so you can hide all your stitches- then you can just go with it and sew them in it whatever positions you like. Also just as a note you can sew two cords on together at the same time (just follow the stitch below but go through two cords at the same time).

Firstly put a no knot in your thread and come up from the back near your gem. Take the piece of roleau you want and pass the needle and thread through it from the folded edge to the front seam:

Then go back through, slightly further along, through the front seam to the folded edge and back down into the felt, again slightly further along than where you came up out from:


This is the stitch you use to sew on your roleau. Just keep going all the way around etc.. doing this until your cord is fixed down how you want it. You are effectively hiding your stitches in the roleau seam :)


If you want to secure two ends of a roleau together just go backwards and forwards through each end a few times (again hiding your stitches in the seams) before passing your needle to the back and knotting off:


You can play around and sew the ends how you want:


TO finish off the raw cut ends just glue them slightly to prevent fraying and over sew them down (or pass them through the back of the felt using a large needle).

Keep adding more roleau cords to your design- you can even get little Catherine wheel type swirls by rolling up the roleau and passing your needle and thread back and forth a few times through the wheel and down into the felt to secure:


Add more gems/beads by glueing or sewing :) sewing seed beads in between the roleau can look good (I deliberately spaced about my roleau when sewing it so I could do this more easily):


I sewed them on on bunches of three with a running type stitch:


Here is a close up of how I finished my ends (you could do this for each end individually if you didn't want to overlap them):


Thu back doesn't have to be too neat :p when you are happy cut around it- be careful not to cut any of your stitching though! :

Trace around your piece onto another piece of felt and cut the shape out:


Glue or sew this 2nd piece onto the back of your soutache style creation, add a brooch pin or whatever you want and you are good to go:


Look, all done! :-):


He he he, I hope you like the tutorial. If anyone makes any soutache style jewellery using my tutorial I would love to see pics so please do post a link or send me a picture (iitki@hotmail.co.uk)

Also if you have any questions don't hesitate to ask and I will try to explain things better :p

See you all soon, I hope you are having a lovely weekend,

bye xxxxx


Sunday 20 July 2014

Sunday style

Hi,

My my, it has been quite a while since I brought you a Sunday style! I have one for you today though :) As I mentioned in a previous post I had designed and started making an A line dress (from scratch, making my own pattern etc.) from a shirt and skirt I picked up in the costume store sale. Today we had family friends over so I made sure I got it all done ready to be worn and shown off! Lol :P

Here is it just flat:

Here are some of the details up close:


Folding back the  corners of the pocket flaps was my dad's idea and then I thought I could do the same with the collar and add little buttons to tie everything on :)

If you had forgotten the pieces I got the fabric from here they are:


Here is me wearing The dress:


I am really pleased with how it came out as it fits me really well, as it should because I made it to my measurements :P and it nice and airy for summer.  The colours also go with the colour of my hair too I think- if I am going to indulge myself and be really vain, lol! I will stop now and compliment you all- You all look beautiful today :D xxx

I am off to go and relax now. I have eaten a lot of my dad's delicious food today so need to sit and let it all go down- warm chocolate peanut butter ice cream sundae sauce and brownies is all  that needs to be said! :P

Before I go though I do want to say thank you to everyone who has looked at my new etsy shop. My viewings are increasing which is lovely :-) Also I have a special tutorial coming soon that I have made for you all so keep your eyes peeled! 

See you soon,
Bye xoxoxo

Tuesday 15 July 2014

A big post- with lots of cakes :oP

Hiiii,

Today, as mentioned in the title I bring you a rather large post!
 
The first thing I have to tell you about is my visit to the Fashion and textile museum in London :) I went there for a day course on couture sewing techniques, the price for which included a ticket to their current exhibition of Mexican Rebozos (Mexican rectangular shawl like garments).
 
The sewing room the course took place in was really nice, and I learnt a lot of cool tricks and tips too:


Then at the end of the day I had a wander around the exhibition, here is a really cool Rebozo knitted by Kaffe Fassett:
 
 
Here is a suit made from Rebozos- the cut is really sharp:

 
This dress is also made from a Rebozo- it is so wacky! :P:

 
Haha. This little dude was appliqued onto one of the shawls- I love him because he is wacky too!:

 
This painting is the last picture I have to show you from the exhibition, it was so cool, the canvas is cut away at the loom part so there is a real loom stocking out of the painting, it makes it 3D and makes the painting really come to life:

 
I really must learn more about weaving- the loom fascinated me, trying to work out how all the patterns in the cloth were being created :)
 
Now I am finished telling you about the Mexican shawls I shall move onto another culture- African culture, with a quick picture of the African dress I was helping Stephanie put little bits together of when I went to my Work experience on Monday:

 
The mannequin is slightly to small for this dress really so it doesn't quite show it off to it's full potential but it still does give you some idea of Stephanie's flair for design (and making!). The dress is so vibrant, I love helping Stephanie with her dresses as I love learning more about more traditional/popular African styles, they are so different to what I normally see/wear so they are really inspiring to me :-) My fascination with different cultures styles is also why I visit the Asian wedding fair as well as the UK wedding fair- that way I can see the different aspects specific to different cultures but also how on many levels they intertwine and mix and influence each other. I need there to be an African wedding fair too!

 
You are probably all thinking by now 'where's the cakes? the tile says there is lots of cake!', well don't fret as it is on it's way now :P
 
First up are these double chocolate chip peanut butter cookie cupcakes, I made them as dessert (as part of the American themed dinner party I cooked) for when my nan came round on Friday:


They were peanut butter choc chip sponge with cookie dough frosting and chocolate chips and a cookie to decorate :) They went down really well, my dad liked them especially!
 
After I made those and they went down so well I kind of had the cupcake bug (I've had it for a while now- after doing the TWO cupcake tours :-P). I decided to make some more today, these ones were even more decadent:


Peanut butter, choc chip cookie dough AND caramel cupcakes!: Peanut butter chocolate chip sponge and cookie dough frosting again but this time with a cookie baked at the bottom and a caramel filling too. I reallly liked these ones (though they are super sweet).
 
And because one variety is never enough is it? :P I also made these bounty ones:


Desiccated coconut and milk choc chip sponge, with half a bounty bar baked in the middle. Then coconut milk frosting, half a bounty and a sprinkling of desiccated coconut to top! I haven't tried one of these yet, that is on the menu for tomorrow. My mum said they were good though and my brothers eyes lit up when he was eating it so I should like them :0)
 
I may make making cup cakes my new hobby on the side as I enjoy it and people have expressed to me it is not healthy to think about/read about/practise/learn about sewing, costuming, pattern making etc... 24/7, lol. That will still of course take up most of my time as I couldn't bear to let it not!
 
For example, today I continued working on the dress I am making myself from the HUGE mens shirt I got from the costume store sale (remember? :). I unpicked it so I could basically just use it as fabric then drew up a pattern for a 60's inspired a line dress, here it is so far:

 
It is going to have some decorative pocket flaps and a collar in a matching colour scheme tartan style fabric from a skirt I got in the Costume sale- I will probably get those on it tomorrow- then It will be done. I did the bias binding on the armholes in the sink stitching method I got extra tips on at my couture course on Saturday :o) I have always found it tricky but now I have got techniques to make it not so hard and with practise I will get really neat at it! I want to have it done for Sunday when we are having family friends over for dinner.
 
Work has also started on my mums dress:

 
Quite a bit more hand sewing to go but I am getting there slowly. You have to do it a bit at a time though as I find I have to have the dress hung up as shown whilst sewing to check nothing pulls and that the edges of the panel are going on straight, but it makes your arm ache :0P
 
Phew, that was a long post! But hopefully an interesting one, or possibly just to much of me waffling :P
 
I will let you go now, but not before telling you to have a look at all the new headbands in my shop:  (with more coming soon!), for example, ice creamssss!!!:
 
 
They are inspired by my work experience at Queenie and Teds, the whole Idea of collage like, fun, applique/decoration :)
 
Hehe, now I will officially let you go!
 
Speak to you again soon, I hope you are all well,
 
Bye XxXxXxX
 

Wednesday 9 July 2014

Saving my mum's vintage dress

Hi,
 
Today I bring to you my latest project....
 
A while ago now, when me and my family were on holiday in the IOW my mum bought this beautiful original 1930/40s dress in a vintage shop:
 
 
It fit her really well and looked nice however, when we got it home we realised it had some quite bad watermarks/staining on it :( They hadn't shown up in the shop (we hadn't been lied to, just nobody had noticed them), but are clearly visible in daylight:

 
My mum was really disappointed and hasn't been able to wear the dress due to the visible staining on the bodice and the main stain (pictured above) on the skirt. My mum tried getting it dry cleaned- they tried their best but nothing could be done :-( Again I was sad because my mum really liked the dress and it cost her £125; though this is not extortionate, it is still quite expensive, and definitely is an amount you want to get some enjoyment from.
 
My mum stashed the dress in the wardrobe, then yesterday we were watching a programme on TV called 'This old thing' which was all about vintage clothing and refashioning it. We decided to get the dress out and give it one last attempt to try to make it wearable. I looked at it, assessed it, thought about hard etc... and then I came up with this idea:

 
A central panel of matching colour scheme purple crepe type fabric (fabric from one of the bargains I got in the costume store!). My mum thought that sounded good as she wanted to preserve the dress (so not cut into it) but also to cover all the stains on the bodice and skirt of course- and the panel can do both! Also I knew I had to come up with a solution that was fairly simple in style so as not to overpower the rest of the details on the dress or make it look 'too much'. The simple, clean shape of the panel should be perfect.
 
I started work on it today- I have got the shape tacked onto the dress and the bodice and skirt panels cut out and ready to be seamed together- I will work more on it tomorrow and will of course bring you lots of pictures when the transformation is complete. I really hope it looks gorgeous and I know it would make my mum really happy if she did love it and could wear it- she had kind of written it off after the dry cleaning didn't really work out. I have made it my mission to SAVE MY MUMS DRESS!!!! :0)
 
Hehe, I have also got some alterations I am working on for my next door neighbour too, I need to finish those of tomorrow as well- I will be a busy bee! But in-between I can relax with dad and brother who have both happened to have the day of work/school and we are getting subways, a mcflurry and playing tennis at the park. So that will be nice. I had a good day today as well- me and my mum saw the importance of being earnest at the theatre and had cupcakes from Sweet couture. Mmmmm... I am craving another one now!
 
Lol, I better get off to bed ready for my busy day tomorrow,
 
Speak to you all again soon,
 
Bye XxXxXx

Wednesday 2 July 2014

My amazing day at Queenie and Teds!

Hi,
 
As I mentioned in my last post, today was the day I got to go and do some work experience with the cool clothing up-cyclers; Queenie and Ted. I had such an amazing time and learnt so much! :) They said I could bring something along and that they would teach me how to put some designs chosen by me onto my item.
 
I had a rummage in my wardrobe prior to today and found this velvet blazer I got a while ago, I did like it and had worn it before but I did think it could do with a bit of a jazz up: 
 
 
After today with the lovely ladies of Queenie and Ted (Kally and Linda :) my jacket has been totally transformed, look!:


The design I did on the back is inspired by the recent trips with my dad to the garden centres to buy flowers for our garden :)

 
The bunny fabric was so amazingly sweet- I knew I had to use it. Kally and Linda said they picked it up when they were in Japan showing their work over there :-)


Hehe, I don't think I need to explain why I put the scissors on there! :P
 
I am sooo happy with it, it looks so much better now, and as I said I learnt so much, so thank you Linda and Kally. Probably the best thing is that they said I can come and do another day (helping them with some of their stuff then, now that I have had some practice :).
 
Also.... they have a cabinet in their shop where they put accessories that other makers/artisans have made and they said that I could showcase some of my knitted brooches in there. I was extremely excited, having my work in a street shop, next to other makers work :D
 
Here are all the brooches that are now in their cabinet:

 
Fingers crossed some of them sell as that means; 1. someone liked my brooch enough to buy it and will wear it around, Yay! and 2. Some money for me and Kally and Linda :)
 
Can you tell I have had a good day...? Lol, I think you probably can :P
 
I hope all you people have had a good day as well- you are all so lovely so you definitely deserve it!
 
I better be off to bed now, so I am all ready to get up and do lots of making tomorrow now I have all new ideas after my day today. I also have lots more ideas for items I want to make for my shop too, including some more bracelets in the style of the 'Love' one I recently put up:


See you soon,
 
Bye XxXxXxX